
Exterior Finishing & Windows – Heritage Log Home Renovation, West Grey
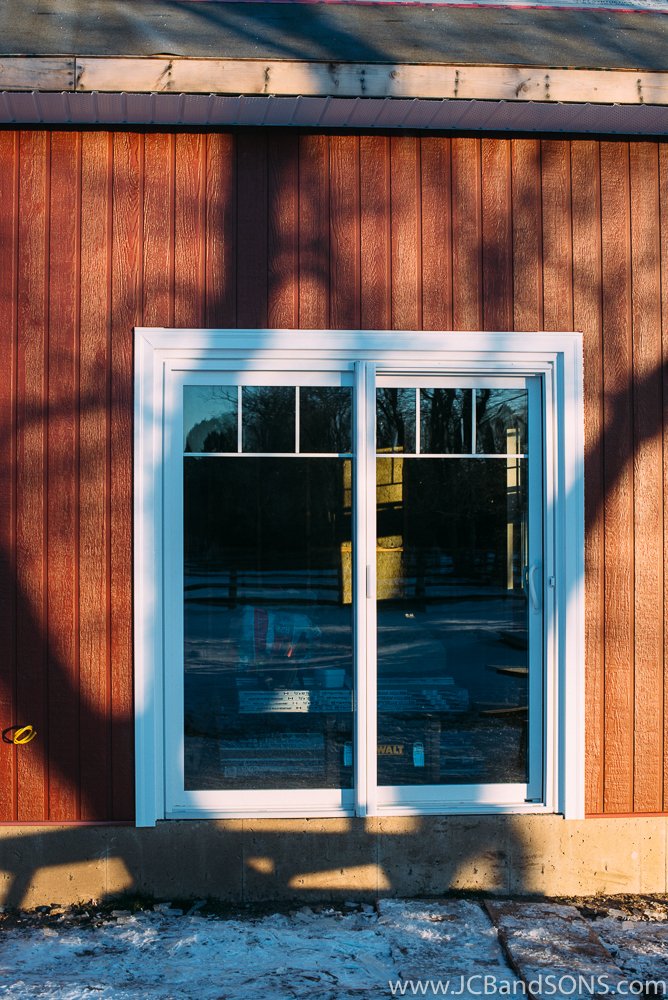
As part of this Priceville-area heritage log home renovation, we completed the exterior finishing on a newly built addition. We installed vertical engineered wood siding and fabricated custom aluminum trims in-house to ensure a clean, durable fit. A synthetic roofing membrane was applied prior to final roof installation, and all new windows and doors were supplied and installed by JCB & SONS. Each unit was carefully flashed with waterproof tapes to guarantee long-term performance in Ontario’s harsh climate.


The existing porch was reworked to tie seamlessly into the new structure, and extended to shield the original log walls from weather exposure. This project combined renovation, new-build construction, and precise exterior finishing—hallmarks of the kind of heritage carpentry and rural craftsmanship we bring to homes across West Grey, Priceville, Durham, and Markdale.

The log home had a fantastic view from the second floor, so we installed these apex shaped windows in the gable wall of the home to take advantage of it. It was one of our favourite features.

John Manville AP foil-faced 1” foam sheathing was used for the wall sheathing to provide continuous insulation over the whole addition. Providing and R-28 wall with the Rockwool batt insulation.


Prior to the install of strapping and siding we installed new Typar weather protection barrier over the existing exterior walls to protect the homes exterior.

The walls were all strapped with 1” strapping to create an air space behind all the new siding.


All the windows and doors were clad with aluminum trims we manufactured on site and installed prior to siding installation.


Check out the completed project @ > https://www.jcbandsons.com

Framing a Heritage Log Home Addition – West Grey Builder
Framing is now complete on this heritage log home addition near Priceville, in the heart of West Grey. JCB & SONS served as the builder and carpenter on this rural home improvement project, handling slab layout and full structural framing. The new space ties into the original log structure and will house mechanical systems like the HRV and high-efficiency furnace, while adding practical year-round storage. This type of log home addition—solid, functional, and built with care—is exactly the kind of craftsmanship we bring to heritage renovations throughout Markdale, Durham, Flesherton, and the surrounding Grey Highlands.


Ethan Bender from Acewood Carpentry was an integral part of this project and was with us from start to finish.

Our Branson is on site with JCB himself and used to safely handle and place materials for this project. Ethan is prepping for installing rigging to set the 40’ LVL ridge beam.
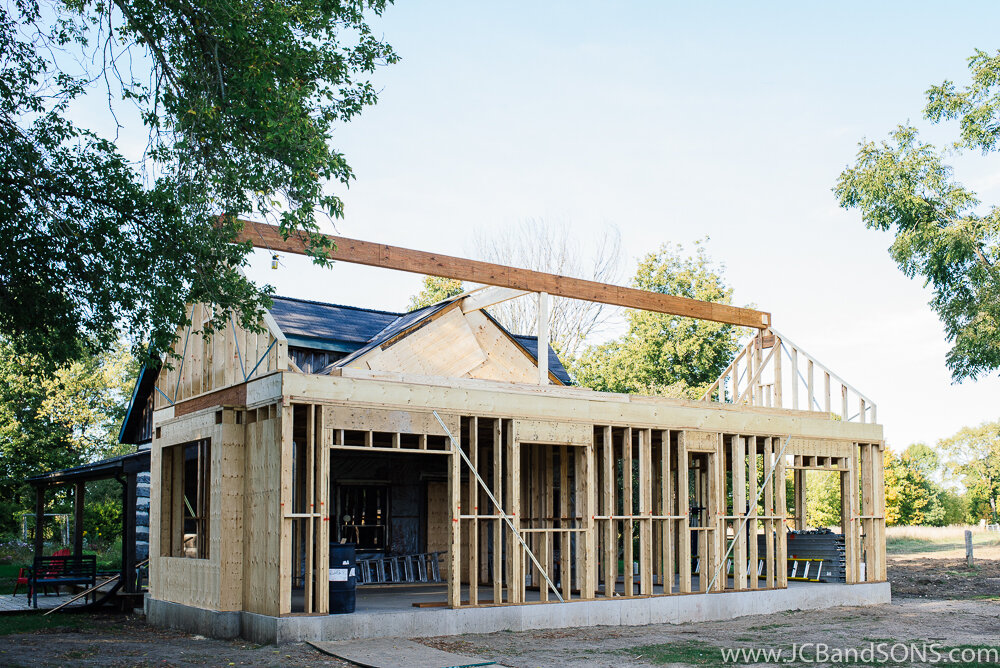

The 40’ 3ply LVL ridge beam is in place with the middle column installed ready to receive the first of our rafters.

JCB cutting our rafters and placing them on our Branson to lift them into place.

Rafters are set higher then the ridge beam to allow baffle vents to run continuously from the vented soffit at the eaves to vented ridge cap at the peak, preventing any ice damming on this roof.

Fascia board lookouts are installed and gable Fascia is started. Almost ready for sheathing.

The roof was sheathed with 5/8” plywood and covered in a combination of Alco ice and water shield as well as Rex synthetic roofing underlayment.

The bump out window roof sheathing was left off so that the spray foam insulators could spray closed cell foam in it while spray foaming all the rim joist in the new addition. These areas are difficult to seal properly with other insulating methods.

The 2” x 12” rafters provide maximum space for storage in the new attic as well as room for insulation and ventilation allowing the correct R value required to keep this home cool in the summer and warm in the winter and prevent any ice damming.

John Manville AP foil-faced 1” foam sheathing was used for the wall sheathing to provide continuous insulation over the whole addition. Providing and R-28 wall with the Rockwool batt insulation.


The interior is a blank canvas, ready for windows, doors and then removing the old exterior wall to open up the existing home to the new addition. This will become the new kitchen and dining room as well as a main floor master bedroom with walk in closet and ensuite.

Heritage Log Home Addition – West Grey Builder Priceville
We broke ground this past August on an 18’ x 40’ addition for a heritage log home near Priceville, Ontario—just outside Durham and close to Flesherton. Built off the back of the original summer kitchen, this new structure includes a conditioned attic space for storage and ties seamlessly into the existing log construction. As the builder, JCB & SONS was hired to manage the excavation, framing, and layout with care—balancing new construction with the historic character of the property.

To maintain a minimal construction footprint, we completed the excavation ourselves using compact equipment. This gave us full control over site timing and allowed the work to proceed efficiently without disturbing the surrounding landscape. This type of heritage home addition—thoughtful, clean, and solid—is a great example of the kind of rural carpentry and renovation work we specialize in across West Grey and the surrounding Grey Highlands.


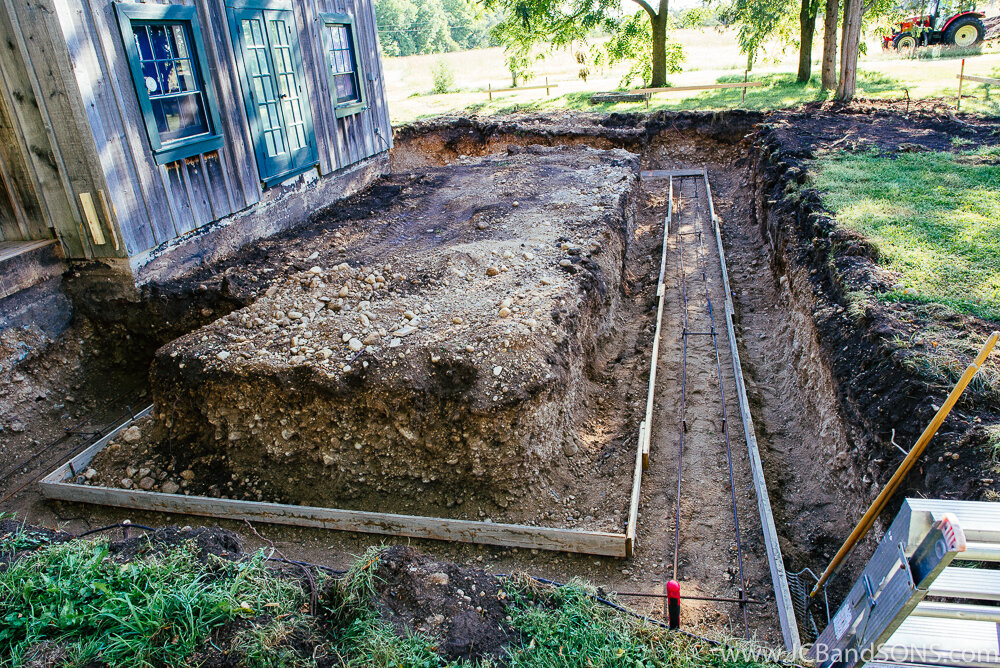
Two runs of rebar were ran in the 8” x 24” footing to keep it super strong set 4’-0” below finished grade to give proper frost protection.

We also formed this project ourselves with Strip-Ease forms to control the schedule keeping the project moving without delays.

Jude Bender on site helping pour walls and making sure equipment was where it needed to be for the guys.

We take a lot of pride keeping our sites clean, keeping ourselves and our clients safe as well as keeping project running efficently.


Amvic Envirosheet was used to provide R10 insulation around the perimeter of the foundation as well as under the poured concrete floor.


John Bender himself on site making sure this floor turned out perfect for this project.

Shout out to Miller’s Concrete for being an amazing supplier and always going the extra mile for us and our customers.

